
Web Applications in Adobe Campaign Classic are server-side public web pages created via a drag-and-drop editor. They are built on top of the ACC JSSP framework and provide access to the workflow ctx variable.
This article explains how Web Applications work in Adobe Campaign Classic and how to use the ctx variable for dynamic content and interactions. For example, a marketer can create a custom web form to capture user data and display personalized content based on recipient information stored in Adobe Campaign.
To choose between Webapp, SOAP and JSSP, see the 📕 JSSP reference. This page is the JSSP step-by-step tutorial.
Preparation
An ACC web app is just a visual tool to generate a JSSP page:
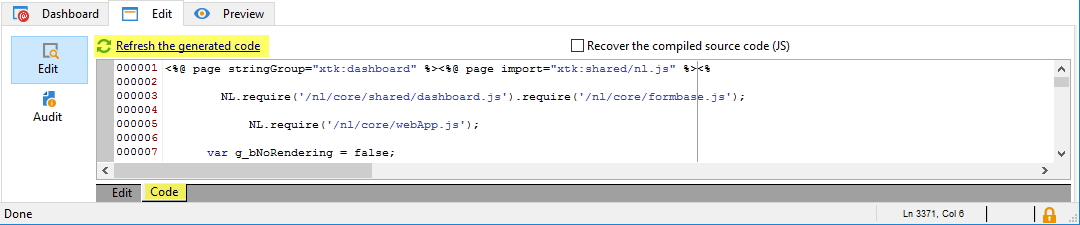
The JSSP code is generated via the XSL template web-webApp.xsl which calls web-core.xsl, which contains:
import core.xsl
<xsl:call-template name="serverScriptInit"/>
response.addHeader(Pragma, Cache-Control, Expires, Content-type)
<xsl:call-template name="initActivities"/>
if !g_bNoRendering
  <html>
    <head>
      <meta http-equiv="MSThemeCompatible" content="Yes"/>
      <meta http-equiv="Content-Type" content="text/html; charset=utf-8"/>
      <xsl:call-template name="css"/>
      [...]
core.xsl contains XSL templates such as
<xsl:template name="serverScriptInit">
<xsl:template name="initActivities">
<xsl:template name="css">
Walkthrough
Using the ctx variable in the Javascript frontend
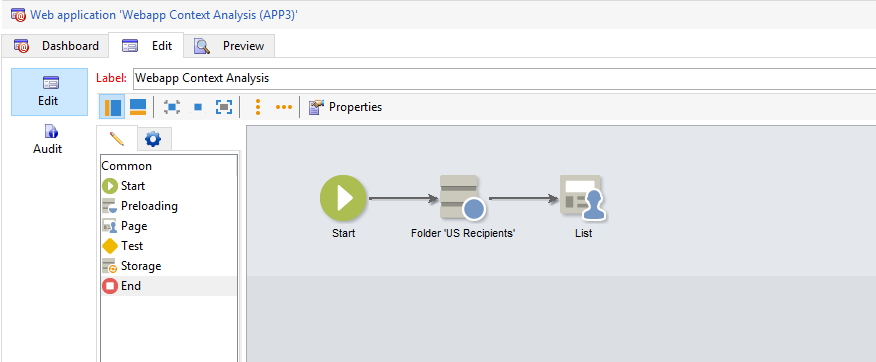
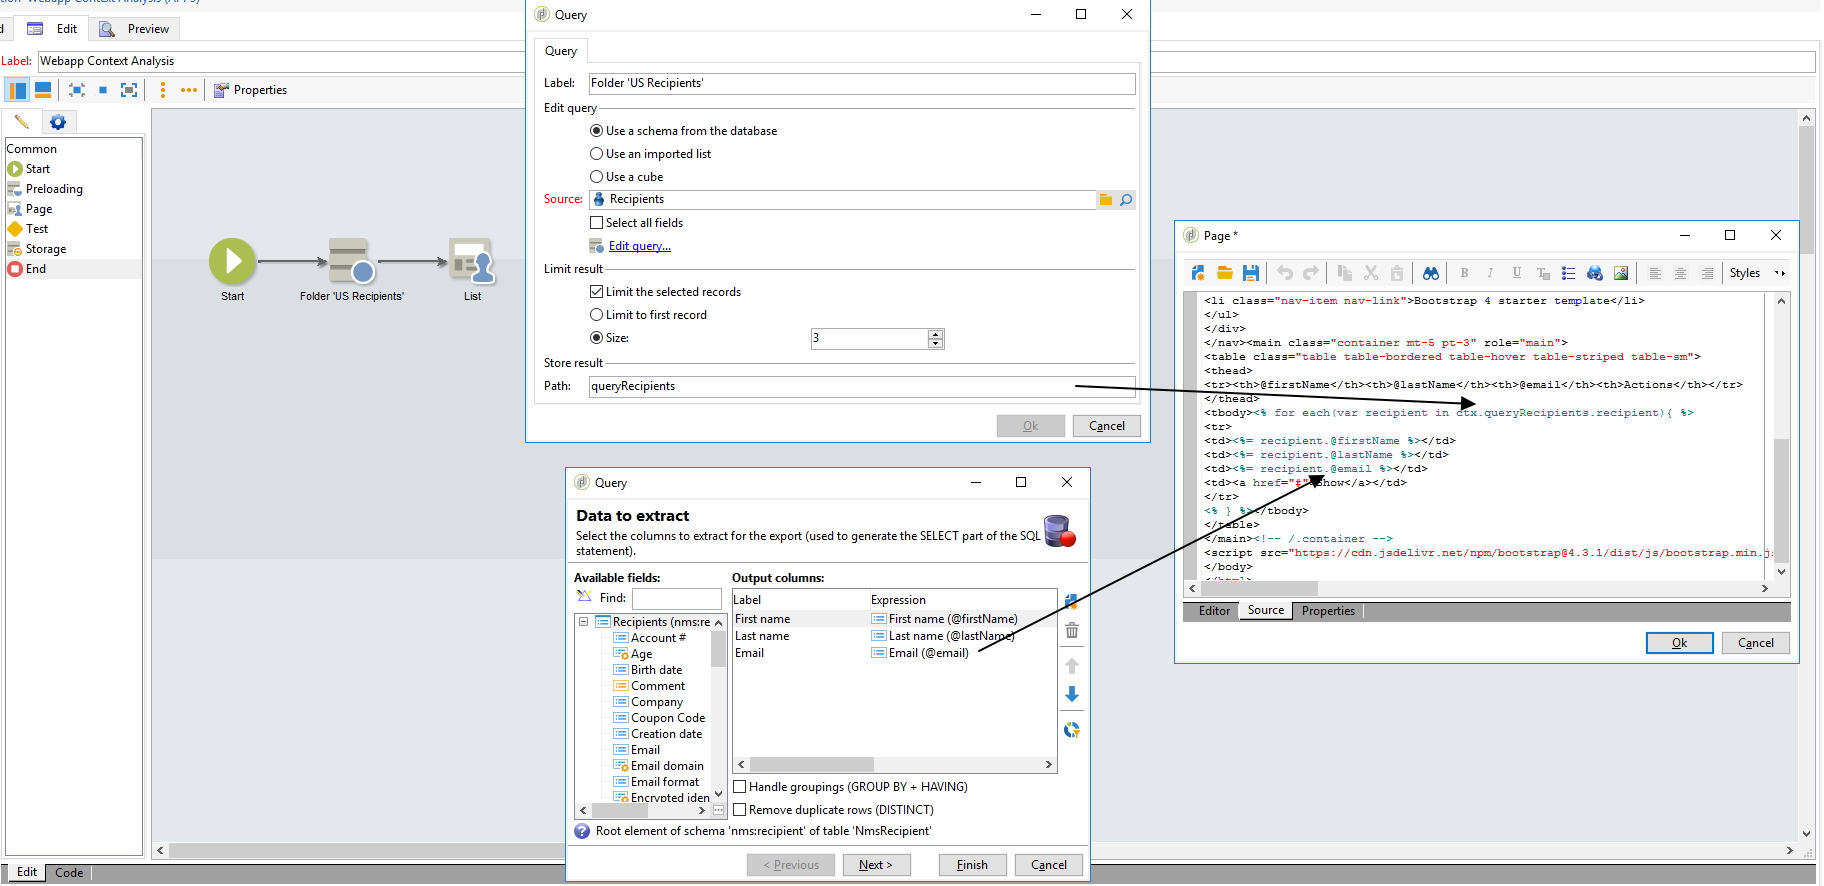
Create a dead simple web app with a query on Recipients (named queryRecipients) and a page (without transition):
HTML code of the Page, using the Bootstrap 4 starter template:
<!doctype html>
<html lang="en">
  <head>
    <meta charset="utf-8" />
    <meta name="viewport" content="width=device-width, initial-scale=1, shrink-to-fit=no" />
    <title>Starter Template · Bootstrap</title>
    <link
      rel="stylesheet"
      href="https://cdn.jsdelivr.net/npm/[email protected]/dist/css/bootstrap.min.css"
    />
  </head>
  <body>
    <nav class="navbar navbar-expand-md navbar-dark bg-dark fixed-top">
      <a class="navbar-brand" href="#">Navbar</a>
      <button
        class="navbar-toggler"
        id="input155197075600849"
        aria-expanded="false"
        aria-controls="navbarsExampleDefault"
        aria-label="Toggle navigation"
        type="button"
        data-target="#navbarsExampleDefault"
        data-toggle="collapse"
      >
        <span class="navbar-toggler-icon"></span>
      </button>
      <div class="collapse navbar-collapse" id="navbarsExampleDefault">
        <ul class="navbar-nav mr-auto">
          <li class="nav-item active"><a class="nav-link" href="#">Home</a></li>
          <li class="nav-item nav-link">Bootstrap 4 starter template</li>
        </ul>
      </div>
    </nav>
    <main class="container mt-5 pt-3"></main>
    <script
      src="https://cdn.jsdelivr.net/npm/[email protected]/dist/js/bootstrap.min.js"
      type="text/javascript"
    ></script>
  </body>
</html>
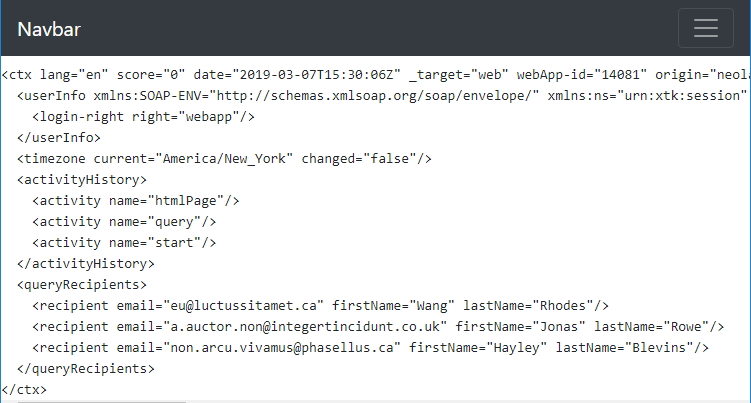
The ctx variable is an XML created automatically by Adobe Campaign and injected into the HTML. With _debug enabled, it is shown in a <pre> block:
It is available as a Javascript DOMElement in the frontend with document.controller.ctx:
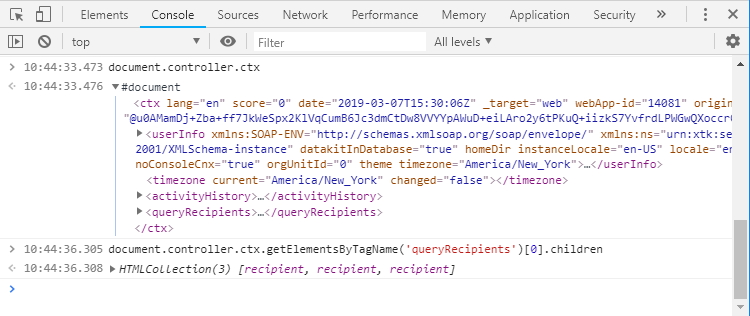
See w3c reference for DOMElement
Using the ctx variable in the Javascript backend
This ctx var can also be used in the backend Scripts and in the Page itself. Insert in <main></main> the following table:
<table class="table table-bordered table-hover table-striped table-sm">
  <thead>
    <tr>
      <th>@firstName</th>
      <th>@lastName</th>
      <th>@email</th>
    </tr>
  </thead>
  <tbody>
    <% for each(var recipient in ctx.queryRecipients.recipient){ %>
    <tr>
      <td><%= recipient.@firstName %></td>
      <td><%= recipient.@lastName %></td>
      <td><%= recipient.@email %></td>
    </tr>
    <% } %>
  </tbody>
</table>
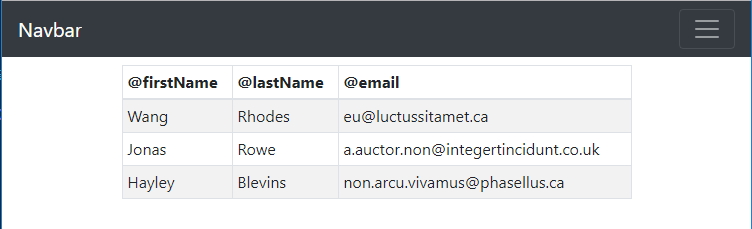
Output:
Recap:
Using ctx for interaction between pages
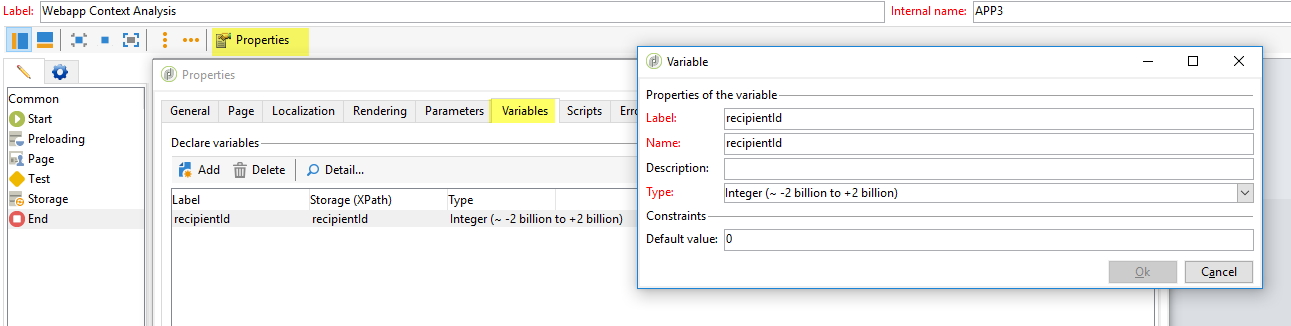
Now that we have a list of recipients, let’s display the customer profile of one selected Recipient. First, create a Web app variable which will store the value of the selected recipient id:
To enable transitions and interactions between pages, the page must contain a <form id="page-form>">. Insert it in the <main:
<main>[...]</main>
becomes
<main><form method="post" name="page" id="page-form">[...]</form></main>
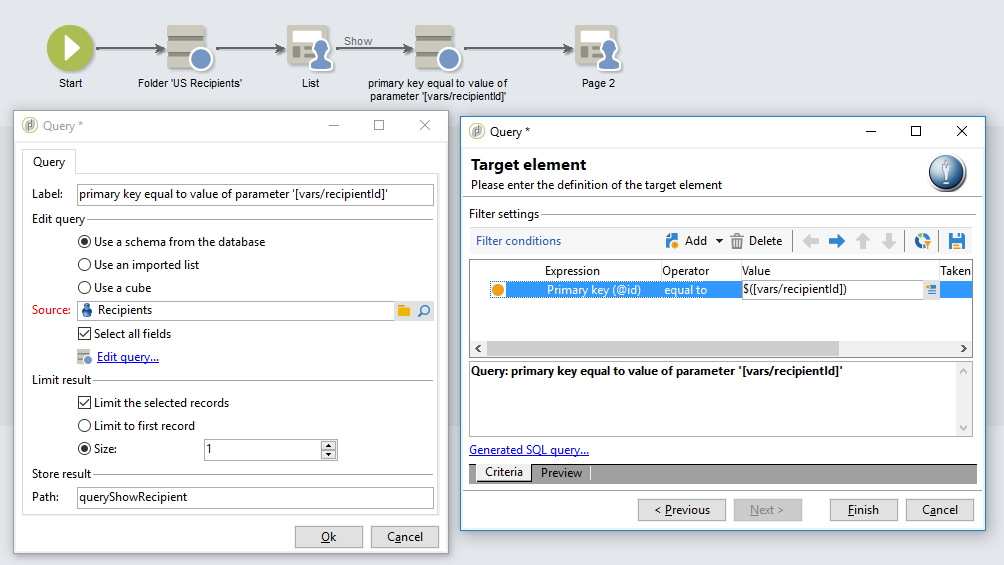
Add a transition named transition1, connected to a query where @id = $([vars/recipientId]) and another page:
In the first page, add a new <td> with a Button as follow:
<td>
  <a
    href="#"
    class="btn btn-sm btn-primary"
    onclick="
      document.controller.setValue('/ctx/vars/recipientId', '<%= recipient.@id %>'); // make sure to wrap the recipient-id in quotes, otherwise the ACC editor will throw a JS error)
      document.controller.submit('next', '_self', 'transition1');"
  >
    Show
  </a>
</td>
This is made possible via the setValue(path, value) and getValue(path) functions of document.controller which is a UIController:
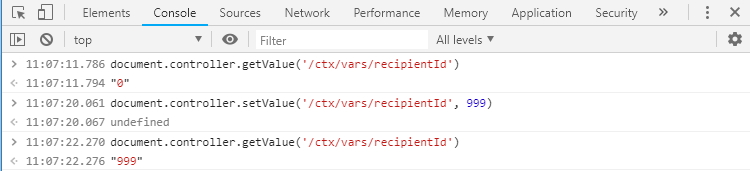
and submit(formAction, formTarget, transitionName):
/**
 * Inject an <input name="ctx"> in the <form id="page-form">,
 * Then submits the form
 *
 * @param strAction      can be any of none|refresh|next|previous
 * @param strTarget      can be any of the HTML attribute target _blank|_self|_parent...
 * @param strTransition  name of the transition to call in case of accAction=next
 * @param bForceNoFile   file are already uploaded, don't reupload it
 * @param bNoWait        don't display waiting box
 */
UIController.prototype.submit = function (
  strAction,
  strTarget = null,
  strTransition = null,
  bForceNoFile = null,
  bNoWait = null
) {};
Save, refresh, click on Show and you’ll get this:
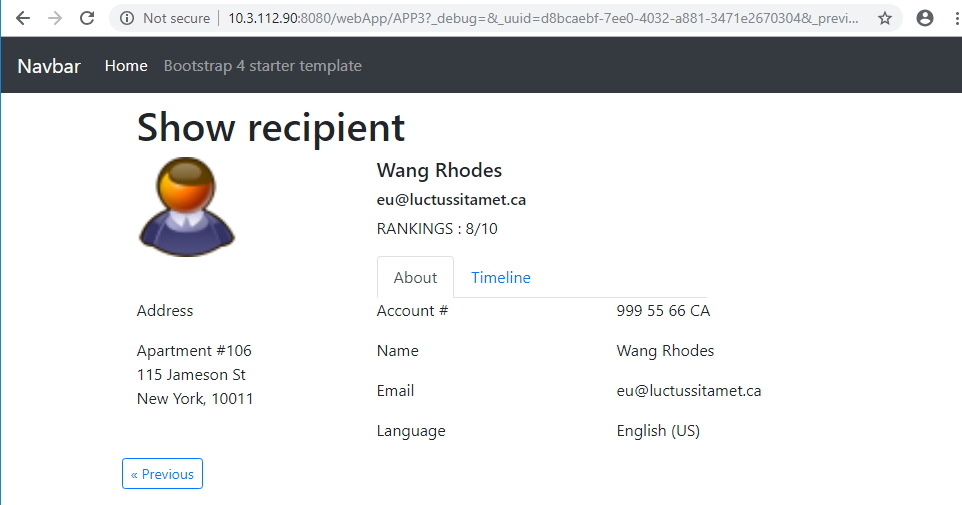

For both pages, download the HTML codes on gist.github.com.
Validation & troubleshooting
How to test
To test the web app, ensure that the ctx variable is correctly populated and accessible in both the frontend and backend. Verify that transitions between pages work as expected and that data is correctly passed using the ctx variable.
Common errors
-
Missing
ctxvariable: Ensure that the web app is correctly configured with queries and that thectxvariable is being populated. -
Transition errors: Verify that transitions are correctly named and that the
document.controller.submit()function is being called with the correct parameters.
Going further
Update a recipient based on ctx.recipient.@id
var now = formatDate(new Date(), "%4Y-%2M-%2D %02H:%02N:%02S");

NLWS.xtkSession.Write({
  recipient: {
    xtkschema: "nms:recipient",
    _operation: "update",
    _key: "@id",
    id: ctx.recipient["@id"],
    lastModified: now,
    firstName: "New first name",
  },
});

// equivalent to:
var recipient = NLWS.nmsRecipient.load(ctx.recipient["@id"]);
recipient.firstName = "New first name";
recipient.save();
Use images and enum
📕 route resolves a resource key to a URL; pair it with an enum-image lookup:
<%= NL.route('nms:task.png', 'reverse_img') %> // '/nms/img/task.png'

/**
 * Given a list of <enumValue>, return img using name
 *
 * @param enum XML, <node><enumValue img="nms:canceled.png" name="canceled"/><enumValue img="nms:task.png" name="todo"/></node>
 * @param enumName string, 'canceled'
 *
 * @example getEnumFieldWithName(<node><enumValue img="nms:canceled.png" name="canceled"/><enumValue img="nms:task.png" name="todo"/></node>, 'canceled', 'img') // nms:canceled.png
 */
function getEnumFieldWithName(enum, enumName, enumField){
  for each(var e in enum.enumValue){
    if(e.@['name'] == enumName){
      return e.@[enumField];
    }
  }
  return '';
}
<%= getEnumFieldWithName(ctx.queryEnumClientelingStatus, task.@status2, 'img') %> // nms:canceled.png

<img class="nlui-widget" src="<%= NL.route(getEnumFieldWithName(ctx.queryEnum, aVariableHere, 'img'), 'reverse_img') %>"/>
Use NL.QueryDef to execute client-side SOAP calls in Javascript from the browser
Can be used to create a Single Page App (SPA) for specific goals, such as a read-only view of recipients, with filters, orders, etc.
⚠️ the result is in XML format. For JSON format see next chapter.
var queryDef = new NL.QueryDef(
  "nms:recipient",
  NL.QueryDef.prototype.OPERATION_SELECT
);
queryDef.addSelectExpr("@id"); // add the column @id to the select clause
queryDef.addSelectExpr("@firstName", "@newAttr"); // set @firstName as an attr named "newAttr" in the result XML
queryDef.addSelectExpr("@lastName", "newNode"); // set @lastName as a node named "newNode" in the result XML
queryDef.setLineCount(2); // SQL LIMIT
queryDef.setStartLine(10); // SQL OFFSET
queryDef.setShowSQL(true); // create a <dataSQL>SELECT x,y from Z</dataSQL> node in <recipient-collection>
queryDef.addWhereConditionExpr("@email = '[email protected]'"); // add a where condition on @email
var callback = {
  onXtkQueryCompleted: function (queryDef, res, error) {
    console.log("Recipients found!", res); // see below for res output
  },
};
queryDef.execute(NL.session.serverURL + "/nl/jsp/soaprouter.jsp", "", callback);
Output, res content:
<recipient-collection>
  <recipient id="1" newAttr="Jane"><newNode>Doe</newNode></recipient>
  <recipient id="2" newAttr="John"><newNode>Doe</newNode></recipient>
  <dataSQL>
    SELECT   R0.iRecipientId, R0.sFirstName, R0.sLastName FROM NmsRecipient R0 WHERE (R0.sEmail = E'[email protected]') LIMIT 2 OFFSET 10
  </dataSQL>
</recipient-collection>
Above code taken from nl6/web/core/dce/contentEditor.js loadFromTemplateId: function(templateId).
Doc for queryDef.execute() @ nl6/web/code/queryDef.js:
/** Do the soap call
 * @strUrl : soap router url
 * @sessionToken
 * @asyncTarget : enable the asynchronious mode and define the objet to
 *                notify. That object must implement a onXtkQueryCompleted()
 *                method.
 */
NL.QueryDef.prototype.execute = function(strUrl, sessionToken, asyncTarget)
Use POST /xtk/queryList.jssp to get objects in Javascript from the browser
POST a single queryDef param (a JSON, URL-encoded) to /xtk/queryList.jssp to get the result as JSON. See queryList:
var postData = {
  operation: "select",
  schema: "xtk:workflow",
  startLine: 0,
  lineCount: 30,
  select: {
    node: [
      { expr: "[.]", alias: "@cs" },
      { expr: "@label", alias: "@label" },
      {
        expr: "[process/@startState]",
        alias: "@startState",
        enabledIf: "HasPackage('nms:campaign')",
      },
    ],
  },
  where: {
    condition: [{ expr: "@isModel=0" }],
  },
  orderBy: {
    node: [{ expr: "@lastModified", sortDesc: true }],
  },
};
$.post(
  "/xtk/queryList.jssp",
  { queryDef: encodeURIComponent(JSON.stringify(postData)) },
  function (response) {
    console.log(response); // {data: Array(30), needPagination: true}
    console.log(response.data); // [{cs: " ()", label: "", startState: "0", _schema: "xtk:workflow"}]
  }
);