
After a delivery is sent, the real work begins: updating CRM fields, exporting files, triggering follow-up sequences. Post-processing patterns let you separate that logic from the delivery itself — and scale it across campaigns.
Business Case
Post-processing can be used to:
- flag delivered contacts in a CRM field
- export a file for a service provider
- trigger a follow-up SMS 48h later
None of this belongs inside the delivery itself. Post-processing patterns let you separate concerns, reuse logic, and scale across campaigns.
Pattern 1: Inline - Campaign Workflow
Add a Javascript Code activity after a delivery, with the following code:
logInfo("vars.deliveryId:", vars.deliveryId); // will display "vars.deliveryId: 999999"
var delivery = NLWS.nmsDelivery.load(vars.deliveryId);
logInfo("delivery.label:", delivery.label); // "My Delivery Label"
To debug, enable Display the tasks and the log on the workflow:
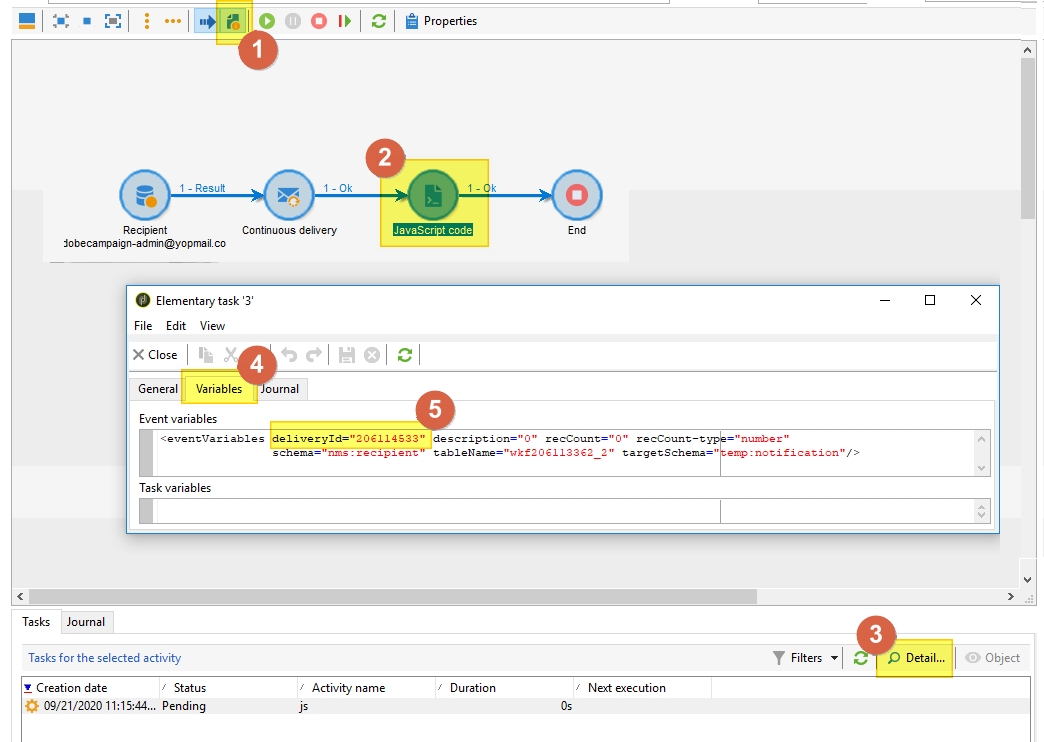
- Activate the option, it will bring up a new panel in the lower section of the Workflow, with 2 tabs: “Tasks” and “Journal”
- Select the activity that comes right after the delivery
- In the “Tasks” tab, make sure the first line is selected, and hit the “Detail” button
- Select the “Variables” tab
- You’ll find the XML version of the
varsvariable content, with thedeliveryIdattribute, hencevars.deliveryId
Pattern 2: Routing - Post-Processing Workflow
Best for: centralised logic shared across multiple deliveries of the same routing.
Setup:
- Create a workflow with: Signal activity (
signal) → JavaScript → End - Duplicate your delivery’s routing in Administration > Platform > External Accounts
- In the routing, set Delivery mode to
ExternalorBulk Delivery— this reveals the Post-Processing option - Select your workflow as the post-processing workflow, activity:
signal - Point your delivery to the duplicated routing via Properties > General > Routing
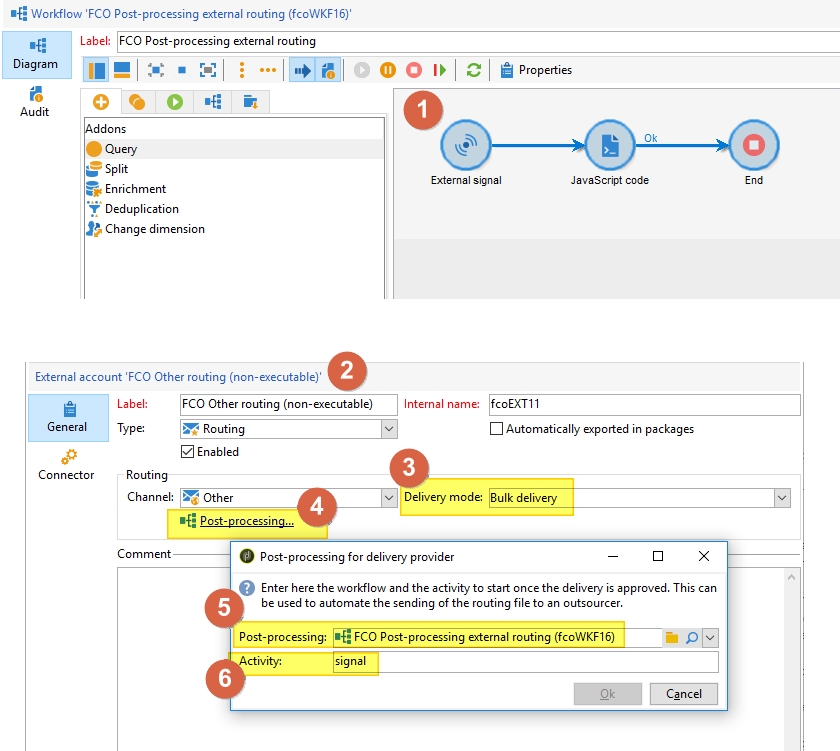
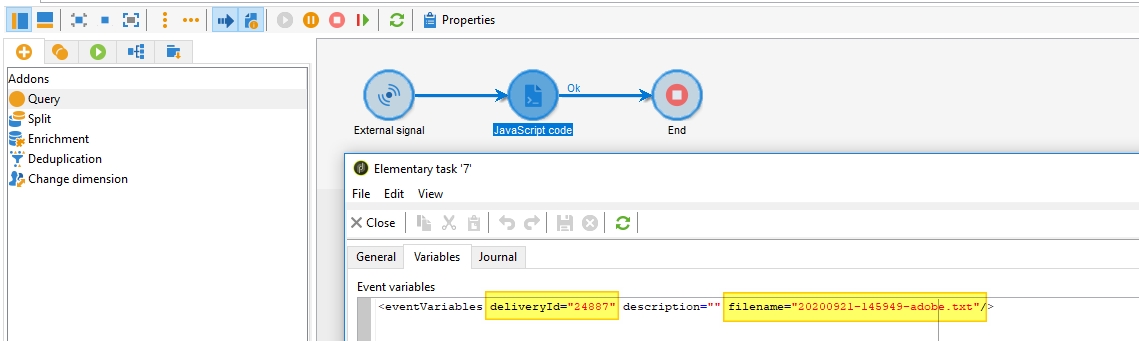
Available variables:
| Variable | Description |
|---|---|
vars.deliveryId |
Delivery ID |
vars.description |
Delivery description |
vars.filename |
Absolute/relative path of the generated file |
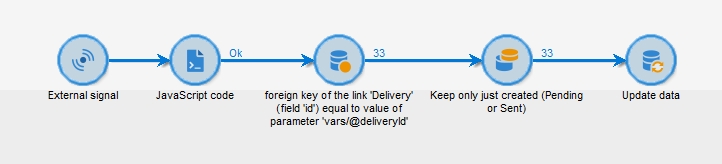
You can chain standard activities: a Query on nms:broadLogRcp where @delivery-id = $(vars/deliveryId), then Update data:
✅ Compatible with Send a Proof.
Pattern 3: Service Provider - Workflow Template
Best for: traceability, audit, or when each delivery execution must produce an isolated workflow instance.
Setup:
- Create a Workflow Template with a JavaScript activity → End (no Signal activity)
- Go to Administration > Campaign Management > Service providers → create a new provider
- In the provider, create a Service and link your workflow template under Jobs > Post-Processing > Workflow template
- In the delivery: Properties > Advanced > Service Provider > Service
Available variables:
| Variable | Description |
|---|---|
instance.vars.iDeliveryId |
Delivery ID |
instance.vars.iOperationId |
Campaign ID |
instance.vars.strFileName |
Absolute/relative file path |
logInfo("instance.vars.iDeliveryId:", instance.vars.iDeliveryId);
logInfo("instance.vars.iOperationId:", instance.vars.iOperationId);
vars.filename = instance.vars.strFileName;
logInfo("vars.filename:", vars.filename);
instance.vars.isProof = NLWS.nmsDelivery.load(instance.vars.iDeliveryId).FCP;
logInfo("instance.vars.isProof:", instance.vars.isProof);
⚠️ Not compatible with Send a Proof.
⚠️ The standard
supplierMgtworkflow must be running for execution to trigger. (Source)
Which Pattern Should You Use?
| 1. Inline | 2. Workflow Template | 3. Service Provider | |
|---|---|---|---|
| Reusable across campaigns | ❌ | ✅ | ✅ |
| One workflow instance per delivery | ❌ | ❌ | ✅ |
| Works with Send a Proof | ✅ | ✅ | ❌ |
| Requires routing change | ❌ | ✅ | ✅ |
| Audit / traceability | ❌ | ❌ | ✅ |
Going Further
- Configure acc CLI for your project structure — customise folders, filters, and decomposition rules
- Workflow & JavaScript for the Power User — advanced JavaScript patterns inside workflows
- Complete queryDef reference for database administration — querying delivery, trackingLog, and any data programmatically